Note
Access to this page requires authorization. You can try signing in or changing directories.
Access to this page requires authorization. You can try changing directories.
Note
Microsoft 365 Agents Playground (previously known as Teams App Test Tool) is available in the latest prerelease version of Microsoft 365 Agents Toolkit (previously known as Teams Toolkit). Ensure that you install the latest prerelease version of Agents Toolkit.
Agents Playground makes debugging bot or agent-based apps effortless. You can chat with your bot and see its messages and Adaptive Cards as they appear in different channels. You don’t need a Microsoft 365 developer account, tunneling, or real client app and application registration to use Agents Playground.
The following image shows a sample app displaying an Adaptive Card with a list of commands in Agents Playground. It also provides a description of the commands so that you can test your app without manually searching your code:

The following are the advantages of Agents Playground:
Sandbox environment: The sandbox environment of Agents Playground emulates the behavior, look, and user experience of the real one.
Tunneling: An external tunnel service isn't necessary as Agents Playground runs on a local server that your bot can communicate with.
Reduce account dependencies: Microsoft 365 Developer tenant and the app uploading permissions aren't necessary to debug the application.
Rapid inner-loop iterations: Optimizes the process of making changes to the app design and application logic without having to redeploy the application to the cloud.
Mock data and activities: Agents Playground makes it easy to test complex scenarios such as, sending a welcome message when a new member joins the channel, using mock data and activity triggers.
Reliable: Agents Playground is reliable as the application's Adaptive Card utilizes the same rendering technology as in Teams or WebChat.
Integration with existing applications: Agents Playground integrates effortlessly with existing applications built with Agent SDK or Teams AI library.
Support for different scopes: Agents Playground supports testing in personal, team, and group chat scopes.
Prerequisites
Ensure you install the following tools for building and deploying your applications in Agents Playground:
| Install | For using... | |
|---|---|---|
| Agents Toolkit | A Microsoft Visual Studio Code extension that creates a project scaffolding for your app. Use the latest prerelease version. | |
| Node.js | Back-end JavaScript runtime environment. For more information, see Node.js version compatibility table for project type. | |
| Visual Studio Code | JavaScript, TypeScript, or SharePoint Framework (SPFx) build environments. Use the latest version. |
Understand Agents Playground
Agents Playground is an npm package that has a CLI command called teamsapptester. When you run teamsapptester start, it opens a web app on your local machine that emulates the Teams or WebChat client and Bot Framework service. This web app doesn't need any cloud resources as it uses mock data to simulate the contextual information.
To use an application on Agents Playground, you need to provide:
- Message endpoint: A message endpoint is the URL that links Agents Playground and your application. You can update the endpoint with the
BOT_ENDPOINTenvironment variable, start Agents Playground with option--app-endpoint, or just use the default value ofhttp://localhost:3978/api/messages. - Configuration file (Optional): A configuration file informs Agents Playground about your customized contextual information in Teams. The file is named .m365agentsplayground.yml in the project's root folder. If Teams can't find this file, it uses the default configuration. For more information, see customize Teams context.
Agents Playground experience in Agents Toolkit
Agents Playground offers a faster debug experience for applications when compared to the real environment.
Open Visual Studio Code.
Select the Microsoft 365 Agents Toolkit
 icon in the Visual Studio Code Activity Bar.
Select Create a New Agent/App > Teams App.

Select Agent for Teams.

Select Basic Agent for Teams. If you need a different functionality for your agent, pick a different option.

Select Azure OpenAI and enter service key. If you are using OpenAI, pick a different option.

Select JavaScript.

Select Default folder.

To change the default ___location, follow these steps:
Select Browse.

Select the ___location for the project workspace.
Select Select Folder.

Enter a suitable name for your app and then select the Enter key.

A dialog appears, where you need to choose yes or no to trust the authors of the files in this folder.

From the left pane, select Run and Debug (
Ctrl+Shift+D) and select Debug in Microsoft 365 Agents Playground (Preview) in dropdown list.
Agents Playground opens the application in a webpage.


Activity triggers
You can mock an activity in Agents Playground using activity triggers. There are two types of activity triggers:
Predefined activity triggers
Agents Playground provides predefined activity triggers to test the functionalities of your app.
| Category | Activity | Handler |
|---|---|---|
| Trigger Installation Update Activity | Install application Uninstall application |
onInstallationUpdate onInstallationUpdateAdded onInstallationUpdate onInstallationUpdateRemove |
| Trigger Conversation Update Activity | Add user Add application Add channel |
onMembersAddedonTeamsMembersAddedEvent onTeamsChannelRenamedEvent |
| Remove user Remove application Remove channel Remove team |
onMembersRemoved onTeamsMembersRemovedEvent onMembersRemoved onTeamsMembersRemovedEvent onTeamsChannelDeletedEvent onTeamsTeamDeletedEvent |
|
| Rename channel Rename team |
onTeamsChannelRenamedEvent onTeamsTeamRenamedEvent |
Note
All types of activities aren't available in all scopes. For example, you can't add or remove a channel in a personal chat or a group chat.
Predefined activity triggers are available in the Mock an Activity menu in Agents Playground.
To mock an Add user activity, follow these steps:
In Agents Playground, go to Mock an Activity and select Add user.

A pop-up window appears to preview the activity handler.
Select Send activity.

App sends a response.

Custom activity triggers
You can use Custom activity to customize activity triggers such as, reactionsAdded, to fit the requirements of your bot app. Agents Playground automatically populates the required properties of the activity. You can also modify the activity type and add more properties.
Select Mock an Activity > Custom activity.

Add
messageReactionto customize the activity under the propertytypeand invoke the custom activity.{ "type": "messageReaction", "reactionsAdded": [ { "type": "like" } ], "replyToId": "d60fd1cb-3e8f-44ef-849c-404806ba1b47" }Select Send activity.

Bot sends an
onReactionsAddedhandler in response.
Configure Agents Playground for authentication
When debugging an application that requires authentication, you can configure the Microsoft Entra client ID and client secret, with an optional tenant ID. If you've created your bot using the Azure AI Bot Service, the credentials are available in the bot's App Service under Settings > Configuration. If you're unsure of the values, you can remove them from the configuration file of the locally running application and then run the application in the Agents Playground. If the application doesn't require these settings to run, you don't need to configure them.
Environment variable / Command line
Before starting Agents Playground, you can set the following environment variables: AUTH_CLIENT_ID, AUTH_CLIENT_SECRET, and AUTH_TENANT_ID. These values are used for the default authentication configuration.
When running Agents Playground from the command line, you can also use the options: --client-id, --client-secret, and --tenant-id.These options override the default environment variable settings.
Client side interface
After Agents Playground has started, you can still configure authentication through the client interface as follows:
Select Configure Authentication.

Fill in fields in the form and select Save.
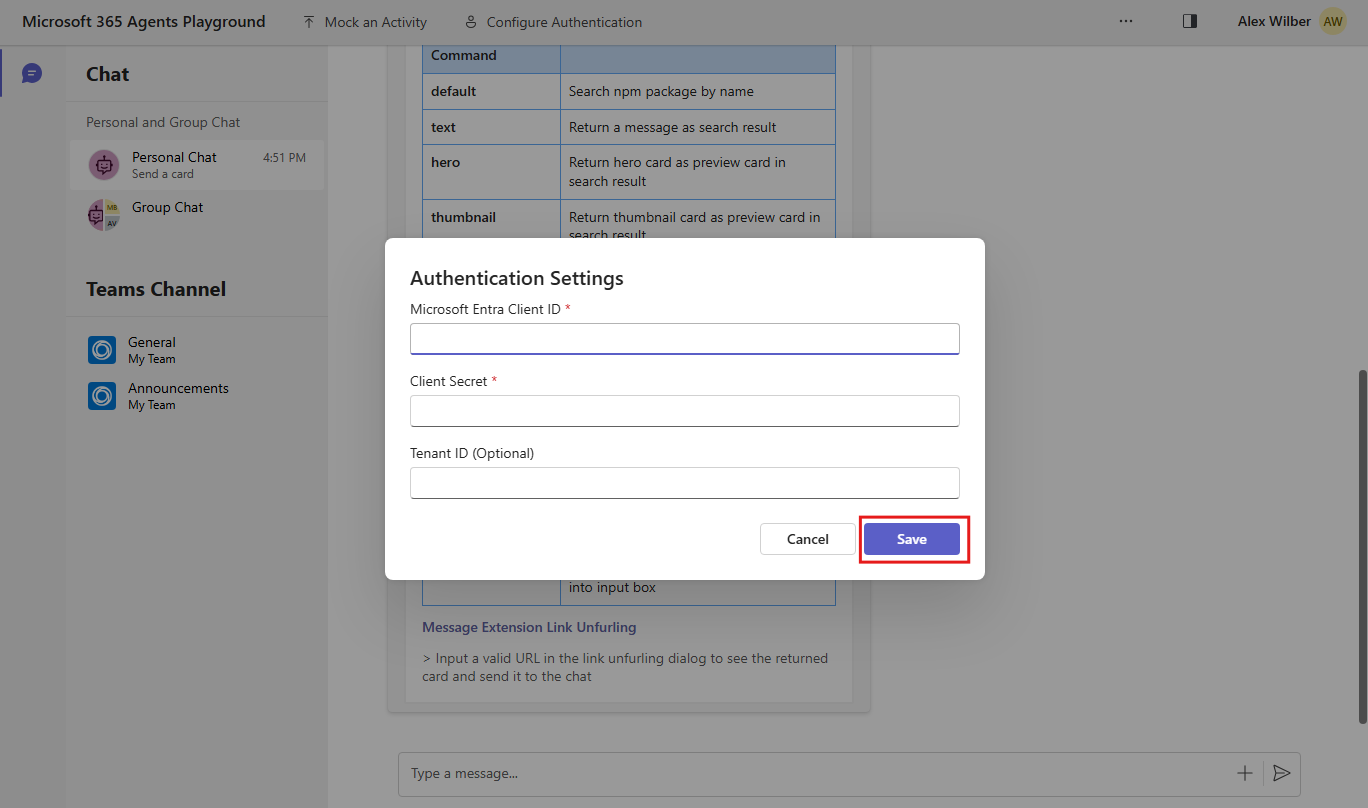
The log panel shows the message if the configuration is successfully set.

Authentication logic
Agents Playground acquires a JWT token using the provided authentication settings and includes it in the Authorization header when communicating with the application. The JWT token in the application's response header also is validated by Agents Playground. For more details about the authentication process, see Authentication with the Bot Connector API.
Multiple channel support
Teams is the default channel used for debugging your application, but other channels are also supported. You can change the channel by setting the DEFAULT_CHANNEL_ID environment variable or by using the --channel-id option when starting Agents Playground from the command line.
Currently, the accepted channel IDs are: msteams, directline, webchat, and emulator. When you set a channel ID, the properties of the messages sent to the application changes accordingly to simulate a real environment. For the directline and webchat channels, a corresponding client is displayed, and card rendering differs from that of the Teams channel.

Customize Teams context
The configuration file in the project's root folder allows you to customize Teams context information such as chats, teams, and users. It provides mock data for testing Bot Framework APIs or methods from the Agent SDK or Teams AI Library, such as TeamsInfo.getTeamMembers.
Default configuration
Agents Playground contains a built-in configuration file in the project's root folder.
# yaml-language-server: $schema=https://aka.ms/teams-app-test-tool-config/0.1.0/config.schema.json
# Visit https://aka.ms/teams-app-test-tool-config-guide for more details on this file.

# This configuration file customizes the Teams context information like chats, teams, and users.
# It contains mock data for testing Bot Framework APIs or Bot Builder SDK methods such as TeamsInfo.getTeamMembers().
# You can customize this file to change API response if your bot code uses these APIs.
version: "0.1.0"
tenantId: 00000000-0000-0000-0000-0000000000001
bot:
  id: 00000000-0000-0000-0000-00000000000011
  name: Test Bot
currentUser:
  id: user-id-0
  name: Alex Wilber
  userPrincipleName: alexw@example.com
  aadObjectId: 00000000-0000-0000-0000-0000000000020
  givenName: Alex
  surname: Wilber
  email: alexw@example.com
users:
  - id: user-id-1
    name: Megan Bowen
    userPrincipleName: meganb@example.com
    aadObjectId: 00000000-0000-0000-0000-0000000000021
    givenName: Megan
    surname: Bowen
    email: meganb@example.com
  - id: user-id-2
    name: Adele Vance
    userPrincipleName: adelev@example.com
    aadObjectId: 00000000-0000-0000-0000-0000000000022
    givenName: Adele
    surname: Vance
    email: adelev@example.com
  - id: user-id-3
    name: Isaiah Langer
    userPrincipleName: isaiah@example.com
    aadObjectId: 00000000-0000-0000-0000-0000000000023
    givenName: Isaiah
    surname: Langer
    email: isaiahl@example.com
  - id: user-id-4
    name: Patti Fernandez
    userPrincipleName: pattif@example.com
    aadObjectId: 00000000-0000-0000-0000-0000000000024
    givenName: Patti
    surname: Fernandez
    email: pattif@example.com
  - id: user-id-5
    name: Lynne Robbins
    userPrincipleName: lynner@example.com
    aadObjectId: 00000000-0000-0000-0000-0000000000025
    givenName: Lynne
    surname: Robbins
    email: lynner@example.com
personalChat:
  id: personal-chat-id
groupChat:
  id: group-chat-id
  name: Group Chat
team:
  id: team-id
  name: My Team
  aadGroupId: 00000000-0000-0000-0000-000000000031
  channels:
    - id: channel-announcements-id
      name: Announcements
Update the configuration file
If your bot code uses Bot Framework APIs, you can modify the configuration file to customize the API responses. For example, consider an Azure DevOps notification bot installed in a team that fetches inactive bugs from Azure DevOps. It identifies the owners of the inactive bugs, retrieves their email addresses, and sends daily notifications to their personal chats.
To comprehensively test this bot in Agents Playground, ensure to update the configuration file with the correct email addresses of the inactive bug owners.
Go to the
.m365agentsplayground.ymlfile in the project's root folder.Go to the
userssection and update thename,userPrincipleName, andemailof the required user.users: - id: user-id-1 name: Megan Bowen userPrincipleName: meganb@example.com aadObjectId: 00000000-0000-0000-0000-0000000000021 givenName: Megan surname: Bowen email: some-real-user@real-___domain.onmicrosoft.comSave the file and select F5 to debug in Agents Playground.
Note
When you edit the configuration file in Visual Studio Code, Intellisense automatically updates the property names and warns you if you enter invalid values.
It's important to understand that updating the configuration file has three major impacts:
- It affects the responses returned by Bot Framework Connector APIs. For example,
TeamsInfo.getPagedMembers(). - It modifies the details in the activity payload. For example,
activity.recipient. - It influences the user interface in Agents Playground. For example, group chat names.
Limitations
Bot or agent features enabled through the Teams app manifest aren't available as Agents Playground doesn't process it.
Agents Playground doesn't support all types of cards except Adaptive Cards.
Agents Playground doesn't support the following Adaptive Card features:
Agents Playground doesn't support the following experiences:
- Mobile
- Meeting
Agents Playground can emulate the following experiences:
Features Debug in Agents Playground Debug your app locally Basic sending / receiving messages Available Available Bot Framework APIs (TeamsInfo.getPagedMembers()...) Available (respond with mocked data) Available Sending Teams events Available (mock activity) Available Typing indicator Not Available Available Tab, Message extension, Dialogs (referred as task modules in TeamsJS v1.x), Single sign-on (SSO), and non-Adaptive Cards Not Available Available
Debug an existing app with Agents Playground
Ensure you have an existing app created using Agents Toolkit. To debug your app with Agents Playground, follow these steps:
Open the existing bot's project folder in Agents Toolkit.
Go to EXPLORER > .vscode.
Select launch.json and add the following code at the end of the file:
// .vscode/launch.json

{
    ...
    "compounds": [
        ...
        {
            "name": "Debug in Microsoft 365 Agents Playground",
            "configurations": [
                "Attach to Local Service"
            ],
            "preLaunchTask": "Start App in Microsoft 365 Agents Playground",
            "presentation": {
                "group": "1-local",
                "order": 1
            },
            "stopAll": true
        },
    ]
}
Go to tasks.json and add the following code at the end of the file:
    {
      "label": "Start Microsoft 365 Agents Playground",
      "type": "shell",
      "command": "npm run dev:teamsfx:launch-playground",
      "isBackground": true,
      "options": {
        "env": {
          "PATH": "${workspaceFolder}/devTools/teamsapptester/node_modules/.bin:${env:PATH}"
        }
      },
      "windows": {
        "options": {
          "env": {
            "PATH": "${workspaceFolder}/devTools/teamsapptester/node_modules/.bin;${env:PATH}"
          }
        }
      },
      "problemMatcher": {
        "pattern": [
          {
            "regexp": "^.*$",
            "file": 0,
            "___location": 1,
            "message": 2
          }
        ],
        "background": {
          "activeOnStart": true,
          "beginsPattern": ".*",
          "endsPattern": "Listening on"
        }
      },
      "presentation": {
        "panel": "dedicated",
        "reveal": "silent"
      }
    },
  ],
}
Under EXPLORER, create a .localConfigs.playground file and add the following code:
// .localConfigs.playground
# A gitignored place holder file for local runtime configurations when debug in Agents Playground
BOT_ID=
BOT_PASSWORD=
TEAMSFX_NOTIFICATION_STORE_FILENAME=.notification.playgroundstore.json
Go to EXPLORER > env.
Create a .env.playground file and add the following code:
// .env.playground
# This file includes environment variables that can be committed to git. It's gitignored by default because it represents your local development environment
# Built-in environment variables
TEAMSFX_ENV=playground
# Environment variables used by Agents Playground
TEAMSAPPTESTER_PORT=56150
If you have custom environment variables, set their values in .env.playground or .env.playground.user.
Add either an OpenAI key or Azure OpenAI key and endpoint in .env.playground.user.
# SECRET_OPENAI_API_KEY=***********
SECRET_AZURE_OPENAI_API_KEY=***********
SECRET_AZURE_OPENAI_ENDPOINT=<https://your-openai-service-name.openai.azure.com/>
Go to package.json and add the following code under the
scriptsproperty:"scripts": { ... "dev:teamsfx:playground": "env-cmd --silent -f .localConfigs.playgroundnd npm run dev", "dev:teamsfx:launch-playground": "env-cmd --silent -f env/.env.playground teamsapptester start", ... },From the left pane, select Run and Debug (
Ctrl+Shift+D) and select Debug in Microsoft 365 Agents Playground in dropdown list.
Agents Playground successfully debugs your existing bot.
Disabling data collection
If you decide that you don't want to allow Agents Playground to collect usage data, you can easily disable data collection by adding option --disable-telemetry when start Agents Playground via command line.
FAQ
How can I test my app if Agents Playground doesn't support its features?
You can always use the Teams client to test the features that Agents Playground doesn't support. Select the option Debug in Teams (Edge) or Debug in Teams (Chrome) to test your application in the Teams client.
How would I know if Agents Playground doesn't support features in my app?
Agents Playground shows a warning message in conversation and log panel when it detects unsupported features.

Does Microsoft recommend using only Agents Playground for testing applications?
No. We always recommend users to test their applications in the Teams client before moving the application to the production environment.
Code sample
| Sample name | Description | Node.js |
|---|---|---|
| Agents Playground Sample App | A sample app to explore Agents Playground. | View |
Step-by-step guide
Follow the step-by-step guide to debug an AI chat bot using Agents Playground.
See also
Collaborate with us on GitHub
The source for this content can be found on GitHub, where you can also create and review issues and pull requests. For more information, see our contributor guide.
Platform Docs