Note
Access to this page requires authorization. You can try signing in or changing directories.
Access to this page requires authorization. You can try changing directories.
You can deploy a multi-container app to Azure Container Apps by using Visual Studio. Typically, you deploy each container to a separate container app instance, but you include all your app's containers in the same container app environment to allow them to easily and securely communicate with each other. You can configure each container app to either accept requests from within the container environment, or to allow outside traffic. Azure Container Apps is highly flexible and configurable, allowing for many possible microservices scenarios, and a full set of advanced monitoring tools. If you're using Docker Compose to manage on-premises container apps, you might consider trying to port it to a container app environment in Azure.
The process involves a few steps using Visual Studio and the Azure portal. You can also use the Azure CLI to perform these actions, but that's beyond the scope of this tutorial. First, we use the app you built using the Create a multi-container app, and deploy it using the Publish process. Visual Studio walks you through the steps to create the first container app, a container app environment, as well as create a container registry to store the container images. You then run through the Publish process again with the other container app. You specifically must choose the same container app environment in the Publish process. Finally, you need to configure the Redis cache to work with the Azure Redis Cache service. You modify the cache configuration code and republish the Web API. Then, you configure the permissions to grant the app's system-assigned managed identity access to the cache.
Prerequisites
- An Azure subscription. Sign up for a free trial.
- Visual Studio 2022 or later with the Azure development and Web development workloads installed.
- The MulticontainerSample project at
https://github.com/MicrosoftDocs/vs-tutorial-samplesin the docker folder. The sample solution contains two projects, the Web API backend and the ASP.NET Razor front end, as you created in another tutorial. You can also create the two projects from scratch, since they are very simple modifications of the default templates, by following that tutorial. You can skip the Docker Compose steps.
Deploy the Web API backend
In Solution Explorer, right-click on the Web API project node, and select Publish.
Choose the target Azure, and then select Azure Container Apps.
If you're not already signed in with an account that is associated with an Azure subscription, you can sign in now, or change the tenant if you need to.
On the screen where you specify a container app, select Create new to create a new container app.

On the Create Azure Container app page, enter details such as the resource group. For this step, you create a new resource group, a new container environment, and a new container registry.

It might take a little while to create the resources. When it completes, click Next to move to the next step.
In the next step, you create a container registry. If you create a new container registry, you're asked for a few details. You can choose the same region and resource group as the container app.
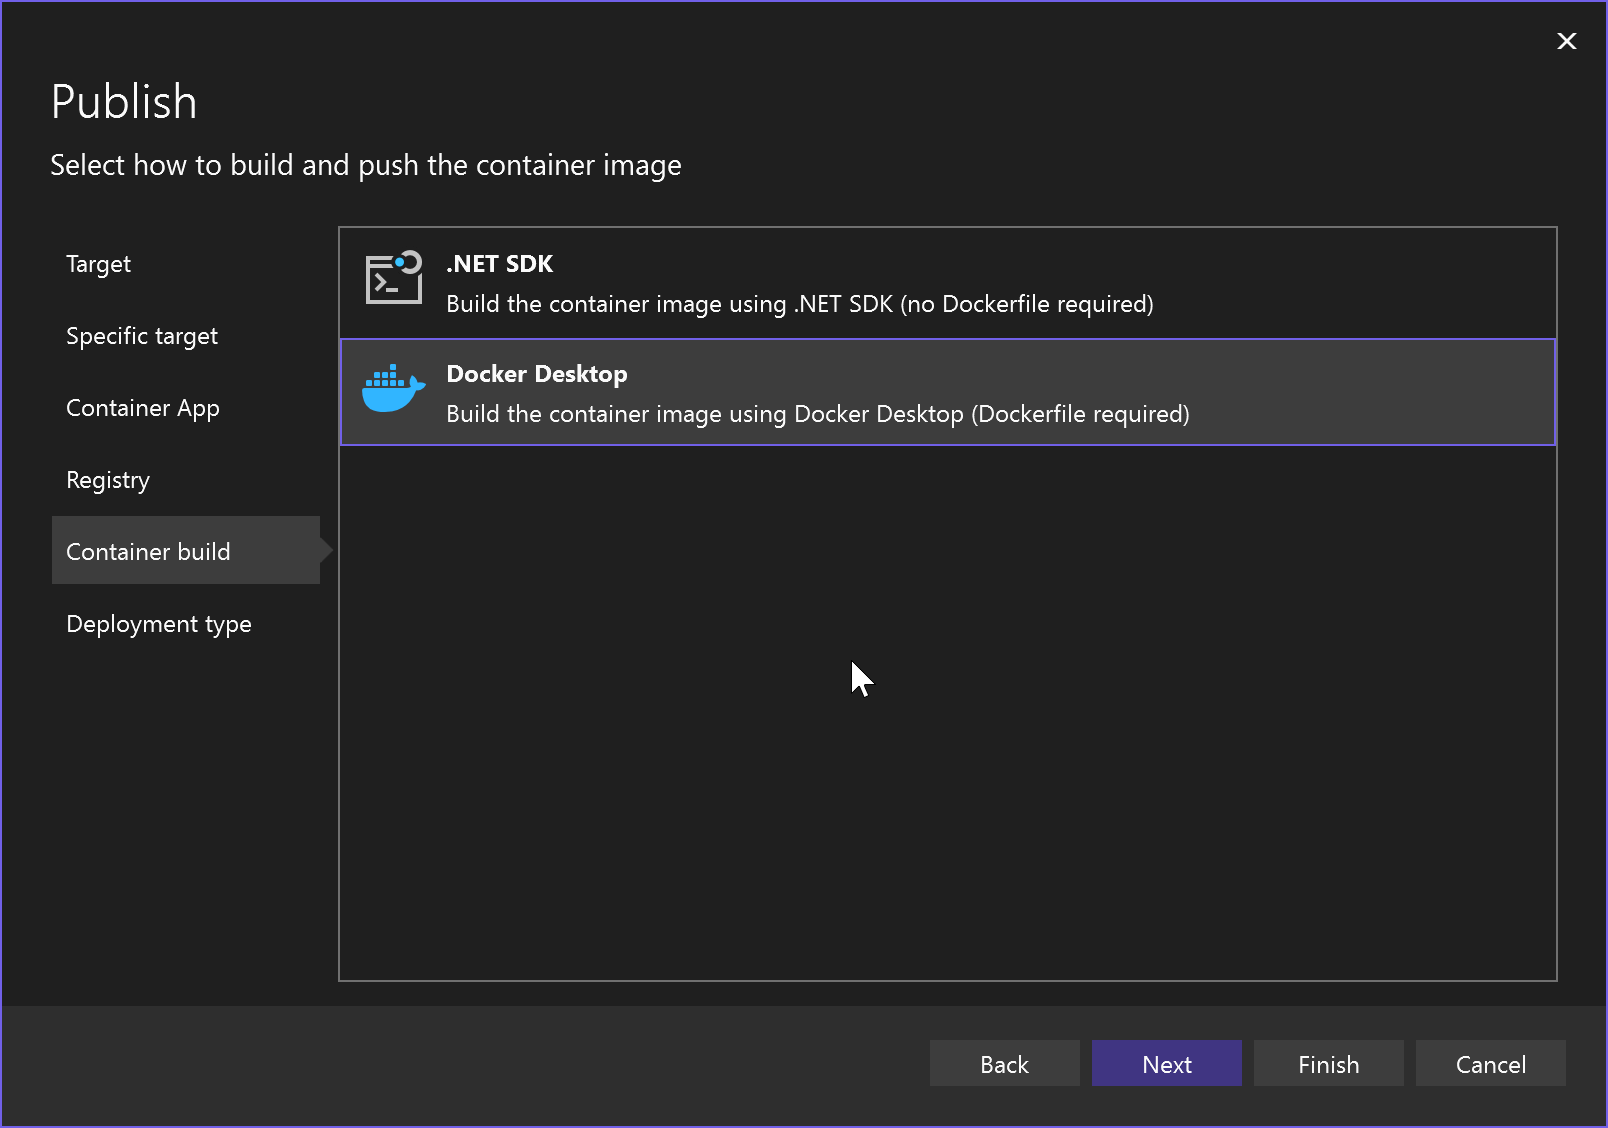
The next step asks you to choose the container build type. Choose .NET SDK if you don't have a Dockerfile, or Docker Desktop if you do.
For the deployment type, choose Publish (generate pubxml file) to create a publish profile.

Select Finish to complete the Publish process, and create a Publish profile. If you see a prompt about extra configuration to access the published container, choose Yes.

You see a page that shows the activity in Azure, and when you close it, the Publish screen now has your container app's information, such as the URL for ingress to the web API.

Click the Publish button to publish to the Azure container app. Visual Studio requests that the Azure resources be created, and starts the publish process for the WebAPI container app.
Visual Studio might try to load the page for the new container app, but this wouldn't be expected to work at this stage.


Now that you've published once, you've created a Publish profile (.pubxml file), so you don't have to repeat these steps the next time you publish. Just click the Publish button on this screen, unless you want to start over, or change any of the Azure resources you specified.
Later, you'll use the Azure portal to make some further configuration changes for the Ingress and to support the Azure Redis Cache, but first, in the next section, you publish the web front end.
Deploy the front end
Modify the front-end code file in Index.cshtml.cs to reference the new URL for the Web API container app. This is the name shown under Resource name in the Web API Publish screen. For container-to-container communication, you can directly use HTTP with the name of the container app, without specifying a fully qualified ___domain name (FQDN) and port number. In the
OnGetmethod, replace the existing line that sets theRequestUrito reference the Web API container app name, as in the following code.request.RequestUri = new Uri("http://<mywebapi-container-app-name>/Counter");In Solution Explorer, right-click on the project node for the Webfrontend project, and select Publish. On the next screen, select Create new to create a new container app.
On the Create new Azure container app screen, choose the same resource group and the same container environment that you created when you published the Web API project.

Important! Select the same container registry that you created previously.

Choose the same options as you did for the Web API for the other steps. The container build type is Docker Desktop, and the deployment type is Publish (generates pubxml file).
Select Finish to complete the Publish process, and create a Publish profile. You see a page that shows the activity in Azure, and when you close it, the Publish screen now has your container app's information, such as the URL for ingress to the Webfrontend app.

View and configure the container apps in the Azure portal
- Sign in to the Azure portal.
- Search for container apps and locate the ones you just created.
- Choose Ingress and configure the following options:
On the Ingress screen, set Ingress traffic to Limited to Container Apps Environment. This means that only the Webfrontend can send requests. Even Visual Studio won't be able to access this service, for example, when you complete the publish process, and Visual Studio tries to load the page, you get an error in the browser instead of accessing the service. This is expected.
Check the Ingress port (it should be 8080). You're using HTTP for the web API call and you can directly reference the container app by name in the request URI. The fully qualified ___domain name (FQDN) generated by Azure Container apps uses an HTTPS URL (as displayed in Visual Studio on the Publish screen), but internal traffic can bypass that.
For the Webfrontend Ingress, you can accept the defaults. The Target port is 8080, because the Ingress handles all requests securely using the FQDN and HTTPS (or HTTP to HTTPS redirection), and forwards them to the Webfrontend using HTTP on container port 8080.
Create the Azure Redis Cache
Follow these steps to create an Azure Redis Cache in the same resource group as the container apps.
In the Azure portal, open the Web API container app you created previously. Open the Service Connector screen, and select Create. The Create connection section appears.
On the Create connection screen, enter the Service type as Cache for Redis, and choose Create new to create a new Redis cache.

Choose a cache, or follow the Create new link to create a cache. If you create a new cache, you might have to return to the container app and Service Connector and repeat the previous steps to create the connection.
For the database, choose "0" to create the first numbered database for this cache.
Move to the Authentication tab. Choose System-assigned managed identity. Accept all other defaults, and select Create. This creates the connection to the cache.
Back in the Service Connector section of the Web API container app, refresh to see the newly connected cache (if you don't see it already), and select the checkbox next to the cache. Select Validate to check the status of the connection. You can expand the cache node to see the values for the environment variables for that Azure cache. For the purposes of this tutorial, you only need AZURE_REDIS_HOST, but you can use the others in real-world code or for a more complete configuration. Use the values here to set the environment variables in the Dockerfile, as described in the next section, so that Web API can connect to the cache.

For more information, see Quickstart: Create a Service Connection for Azure Container Apps from the Azure portal.
Configure roles for managed identity
In the Azure portal, you use Access Control (IAM) on the Azure Redis Cache to grant Contributor access to the container app's system-assigned managed identity.
- In the Azure portal, open the page for the Azure Redis Cache, and select Access Control (IAM).
- Select Add > Add Role Assignment. The Add role assignment page opens.
- Select the Members tab, and choose managed identity.
- Select Select members. The Select members page opens, and select System-assigned managed identity.
- Select Container App, and choose the Web API container app.
- In the Role tab, choose Redis Cache Contributor.
- Select Review and assign. The system processes the request.
- Open Role assignments to see the system-assigned managed identity under the Redis Cache Contributor role.
The next step is to modify the cache configuration in the Web API client to use the DefaultAzureCredential, which is the recommended way to authenticate when you use the system-assigned managed identity. Anyone accessing the application externally isn't required to have specific user-level role assignments to access the resources via this form of identity management. For more information, see Integrate Azure Redis Cache - System-assigned managed identity.
Modify the Web API project to reference the Azure Redis Cache service
Before you publish the Web API project to run in Azure, update it to reference Azure Redis Cache and use a managed identity to access it securely. To accommodate this, you can modify the cache configuration code in Program.cs.
For Azure Redis Cache, you set an environment variable AZURE_REDIS_HOST with the connection information, and then read it in the startup code to connect to Azure Redis Cache, and configure the cache.
You use Azure.Identity to get the DefaultAzureCredential which handles secure authentication with your managed identity.
In Visual Studio, in the Web API project, add a reference to the NuGet packages
Azure IdentityandMicrosoft.Azure.StackExchange.Redis.Add using directives for the packages you just added.
using Azure.Identity;
using Microsoft.Azure.StackExchange.Redis;
Update the configuration code for the Redis Cache. Delete the old code and replace it with the following code. You can review the comments later and uncomment any optional code to suit your own more advanced scenarios.
 // Check the environment variable for the Redis cache host name
 var cacheHostName = Environment.GetEnvironmentVariable("AZURE_REDIS_HOST");
 if (string.IsNullOrEmpty(cacheHostName))
 {
     throw new InvalidOperationException("The environment variable 'AZURE_REDIS_HOST' is not set.");
 }

 var configurationOptions = ConfigurationOptions.Parse($"{cacheHostName}:6380");

 // For system-assigned identity.
 // In the Azure portal, we need to set up Redis service to grant Contributor access to the system-assigned identity
 // for the container app that hosts this Web API service.
 await configurationOptions.ConfigureForAzureWithTokenCredentialAsync(new DefaultAzureCredential());

 var connectionMultiplexer = await ConnectionMultiplexer.ConnectAsync(configurationOptions);

 builder.Services.AddStackExchangeRedisCache(options =>
 {
     options.ConfigurationOptions = configurationOptions;
     options.InstanceName = "SampleInstance";
 });

 // Uncomment the following line if you need to use the ConnectionMultiplexer directly
 // (for example, for advanced Redis operations like Pub/Sub or working with Redis data structures).
 // builder.Services.AddSingleton<IConnectionMultiplexer>(sp =>
 //     ConnectionMultiplexer.Connect(configurationOptions));
The authentication method you set earlier when you created the cache connection is system-assigned managed identity, so the code here is consistent with that choice. If you want to use another authentication methods as well, you need to make changes to the code here. See Integrate Azure Redis Cache - System-assigned managed identity.
Build the Web API project to verify there are no errors.
If you have a Dockerfile, update the base stage of the Dockerfile to define the environment variable
AZURE_REDIS_HOST. You get the host from the Azure portal, when you create the Azure Redis Cache, or from the Service Connector section of the Web API container app page in the portal (see previous section).ENV AZURE_REDIS_HOST mycache.redis.cache.windows.net(Optional) You can define other configuration options in environment variables, for example,
AZURE_REDIS_PORTwhich is usually 6380. For simplicity, this value is hardcoded instead of using an environment variable. You might also wish to setASPNETCORE_ENVIRONMENTto Development.If you're using the .NET SDK container build type (without a Dockerfile), you can set the environment variable in launchSettings.json under
profiles > http."http": { "commandName": "Project", "dotnetRunMessages": true, "launchBrowser": true, "launchUrl": "swagger", "applicationUrl": "http://localhost:5107", "environmentVariables": { "ASPNETCORE_ENVIRONMENT": "Development", "AZURE_REDIS_HOST": "cache11.redis.cache.windows.net" } }You're ready to publish and verify these changes. Select the Publish button on the Publish screen. Visual Studio will attempt to load the page, but this fails because the Web API container app is not accessible to requests outside of the container app environment.
Before you can run the application with the Azure Redis Cache, you need to set up the managed identity with the right permissions to access the cache.
Test the application
Go back to the Publish screen in the Webfrontend project, and click the link on the Webfrontend URL. You should see the Webfrontend app appear with the counter that updates when you refresh the page.
Tip
Azure Container Apps seeks to maximize uptime of your services. If anything goes wrong with one of the services, such that it fails a health probe, Azure Container Apps won't set it as the active revision and use it serve requests. As a consequence, during the development and testing process, you might occasionally find that the latest changes you've made aren't reflected in the live site. In the Azure portal, select Revisions and replicas to view the status of your latest published revision. From there, you can open logs to help troubleshoot the issue.
Congratulations! You successfully published a multicontainer app to Azure Container Apps and verified communication between containers and the use of the Azure Redis Cache within the app.
Clean up resources
To clean up the resources you created during this tutorial, go the Azure portal and delete the resource group that contains the container apps, cache, and container registry.
Next steps
- Learn more about Azure Container Apps.
- Learn about .NET Aspire, a technology that helps you more easily develop complex containerized apps and services that integrate with diverse resources in Azure. .NET Aspire supports development time orchestration, standardized integration with an array of services, as well as tooling support with Visual Studio project templates.
- You can also the Azure command-line interface (CLI) to work with your container apps. Install Azure CLI and get started working with Azure Container Apps by using the Azure CLI commands by following Deploy Azure Container Apps with the az containerapp up command.