有关 WebNN 的简介,包括有关作系统支持、模型支持等的信息,请访问 WebNN 概述。
本教程介绍如何将 WebNN 与 ONNX 运行时 Web 配合使用,以在 Web 上构建使用设备 GPU 加速的硬件的图像分类系统。 我们将利用 MobileNetV2 模型,该模型是 Hugging Face 上用于对图像进行分类的开源模型。
如果要查看并运行本教程的最终代码,可以在 WebNN 开发人员预览版 GitHub 上找到它。
注释
WebNN API 是 W3C 候选建议,处于开发人员预览的早期阶段。 某些功能有限。 我们有当前支持和 实现状态的列表。
要求和设置:
设置 Windows
确保你拥有WebNN 要求部分中详述的 Edge、Windows 和硬件驱动程序的正确版本。
设置 Edge
下载并安装 Microsoft Edge Dev。
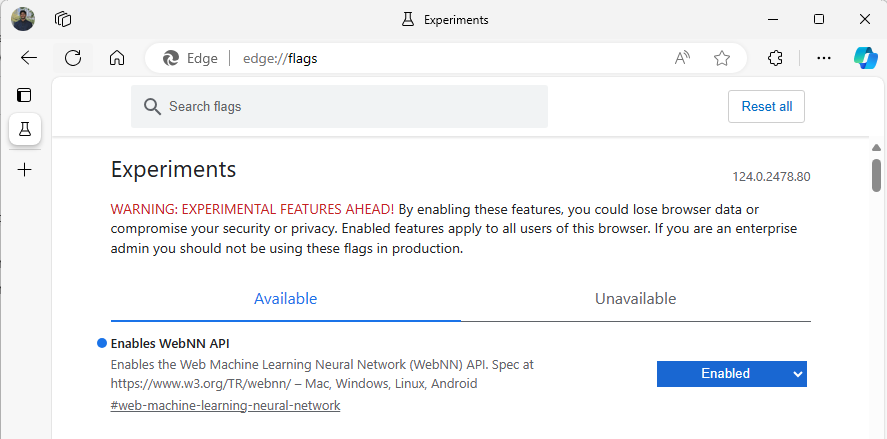
启动 Edge Beta 版,然后导航到
about:flags地址栏中。搜索“WebNN API”,单击下拉列表,并设置为“已启用”。
按提示重启 Edge。
设置开发人员环境
启动 VSCode。
在 VSCode 中下载并安装 VSCode 的 Live Server 扩展 。
选择
File --> Open Folder并在所需位置创建一个空白文件夹。
步骤 1:初始化 Web 应用
- 若要开始,请创建新
index.html页面。 将以下样本代码添加到新页面:
<!DOCTYPE html>
<html lang="en">
  <head>
    <meta charset="UTF-8">
    <meta name="viewport" content="width=device-width, initial-scale=1.0">
    <title>My Website</title>
  </head>
  <body>
    <main>
        <h1>Welcome to My Website</h1>
    </main>
  </body>
</html>
- 通过选择 VSCode 右下侧的 Go Live 按钮来验证样本代码和开发人员设置是否正常工作。 这应在运行样板代码的 Edge Beta 中启动本地服务器。
- 现在,创建一个名为
main.js的新文件。 这将包含应用的 javascript 代码。 - 接下来,从根目录分支创建一个名为
images的子文件夹。 下载并保存文件夹中的任何映像。 对于此演示,我们将使用默认名称 。image.jpg - 从 ONNX 模型动物园下载 mobilenet 模型。 在本教程中,你将使用 mobilenet2-10.onnx 文件。 将此模型保存到 Web 应用的根文件夹。
- 最后,下载并保存此映像类文件。
imagenetClasses.js这为模型提供了 1000 种常用图像分类供模型使用。
步骤 2:添加 UI 元素和父函数
- 在上一步中添加的
<main>html 标记的正文中,将现有代码替换为以下元素。 这将创建一个按钮并显示默认图像。
<h1>Image Classification Demo!</h1>
<div><img src="./images/image.jpg"></div>
<button onclick="classifyImage('./images/image.jpg')"  type="button">Click Me to Classify Image!</button>
<h1 id="outputText"> This image displayed is ... </h1>
- 现在,你将将 ONNX 运行时 Web 添加到页面,这是用于访问 WebNN API 的 JavaScript 库。 在 html 标记的
<head>正文中,添加以下 javascript 源链接。
<script src="./main.js"></script>
<script src="imagenetClasses.js"></script>
<script src="https://cdn.jsdelivr.net/npm/onnxruntime-web@1.18.0-dev.20240311-5479124834/dist/ort.webgpu.min.js"></script>
- 打开您的
main.js文件,并添加以下代码片段。
async function classifyImage(pathToImage){
  var imageTensor = await getImageTensorFromPath(pathToImage); // Convert image to a tensor
  var predictions = await runModel(imageTensor); // Run inference on the tensor
  console.log(predictions); // Print predictions to console
  document.getElementById("outputText").innerHTML += predictions[0].name; // Display prediction in HTML
}
步骤 3:预处理数据
- 你刚刚添加的函数调用了
getImageTensorFromPath,这是你必须实现的另一个函数。 你将在下面添加它,以及它调用以检索图像本身的另一个异步函数。
  async function getImageTensorFromPath(path, width = 224, height = 224) {
    var image = await loadImagefromPath(path, width, height); // 1. load the image
    var imageTensor = imageDataToTensor(image); // 2. convert to tensor
    return imageTensor; // 3. return the tensor
  }

  async function loadImagefromPath(path, resizedWidth, resizedHeight) {
    var imageData = await Jimp.read(path).then(imageBuffer => { // Use Jimp to load the image and resize it.
      return imageBuffer.resize(resizedWidth, resizedHeight);
    });

    return imageData.bitmap;
  }
- 此外,还需要添加
imageDataToTensor上面引用的函数,该函数会将加载的图像呈现为将处理 ONNX 模型的张量格式。 这是一个更相关的函数,但如果你以前曾使用过类似的图像分类应用,它看起来可能很熟悉。 有关扩展说明,可以查看 此 ONNX 教程。
  function imageDataToTensor(image) {
    var imageBufferData = image.data;
    let pixelCount = image.width * image.height;
    const float32Data = new Float32Array(3 * pixelCount); // Allocate enough space for red/green/blue channels.

    // Loop through the image buffer, extracting the (R, G, B) channels, rearranging from
    // packed channels to planar channels, and converting to floating point.
    for (let i = 0; i < pixelCount; i++) {
      float32Data[pixelCount * 0 + i] = imageBufferData[i * 4 + 0] / 255.0; // Red
      float32Data[pixelCount * 1 + i] = imageBufferData[i * 4 + 1] / 255.0; // Green
      float32Data[pixelCount * 2 + i] = imageBufferData[i * 4 + 2] / 255.0; // Blue
      // Skip the unused alpha channel: imageBufferData[i * 4 + 3].
    }
    let dimensions = [1, 3, image.height, image.width];
    const inputTensor = new ort.Tensor("float32", float32Data, dimensions);
    return inputTensor;
  }
步骤 4:调用 ONNX 运行时 Web
- 现在,你已添加检索图像所需的所有函数,并将其呈现为张量。 现在,使用上面加载的 ONNX 运行时 Web 库,你将运行模型。 请注意,若要在此处使用 WebNN,只需指定
executionProvider = "webnn"- ONNX 运行时的支持使启用 WebNN 非常简单。
  async function runModel(preprocessedData) {
    // Set up environment.
    ort.env.wasm.numThreads = 1;
    ort.env.wasm.simd = true;
    // Uncomment for additional information in debug builds:
    // ort.env.wasm.proxy = true;
    // ort.env.logLevel = "verbose";
    // ort.env.debug = true;

    // Configure WebNN.
    const modelPath = "./mobilenetv2-10.onnx";
    const devicePreference = "gpu"; // Other options include "npu" and "cpu".
    const options = {
        executionProviders: [{ name: "webnn", deviceType: devicePreference, powerPreference: "default" }],
      freeDimensionOverrides: {"batch": 1, "channels": 3, "height": 224, "width": 224}
      // The key names in freeDimensionOverrides should map to the real input dim names in the model.
      // For example, if a model's only key is batch_size, you only need to set
      // freeDimensionOverrides: {"batch_size": 1}
    };
    modelSession = await ort.InferenceSession.create(modelPath, options);

    // Create feeds with the input name from model export and the preprocessed data.
    const feeds = {};
    feeds[modelSession.inputNames[0]] = preprocessedData;
    // Run the session inference.
    const outputData = await modelSession.run(feeds);
    // Get output results with the output name from the model export.
    const output = outputData[modelSession.outputNames[0]];
    // Get the softmax of the output data. The softmax transforms values to be between 0 and 1.
    var outputSoftmax = softmax(Array.prototype.slice.call(output.data));
    // Get the top 5 results.
    var results = imagenetClassesTopK(outputSoftmax, 5);

    return results;
  }
步骤 5:处理后数据
- 最后,你将添加一个
softmax函数,然后添加最终函数以返回最有可能的图像分类。 将softmax值转换为介于 0 和 1 之间,这是此最终分类所需的概率形式。
首先,将以下源文件添加到帮助程序库 Jimp 和 Lodash 的 main.js头标记中。
<script src="https://cdnjs.cloudflare.com/ajax/libs/jimp/0.22.12/jimp.min.js" integrity="sha512-8xrUum7qKj8xbiUrOzDEJL5uLjpSIMxVevAM5pvBroaxJnxJGFsKaohQPmlzQP8rEoAxrAujWttTnx3AMgGIww==" crossorigin="anonymous" referrerpolicy="no-referrer"></script>
<script src="https://cdn.jsdelivr.net/npm/lodash@4.17.21/lodash.min.js"></script>
现在,将以下函数添加到 main.js。
// The softmax transforms values to be between 0 and 1.
function softmax(resultArray) {
  // Get the largest value in the array.
  const largestNumber = Math.max(...resultArray);
  // Apply the exponential function to each result item subtracted by the largest number, using reduction to get the
  // previous result number and the current number to sum all the exponentials results.
  const sumOfExp = resultArray
    .map(resultItem => Math.exp(resultItem - largestNumber))
    .reduce((prevNumber, currentNumber) => prevNumber + currentNumber);

  // Normalize the resultArray by dividing by the sum of all exponentials.
  // This normalization ensures that the sum of the components of the output vector is 1.
  return resultArray.map((resultValue, index) => {
    return Math.exp(resultValue - largestNumber) / sumOfExp
  });
}

function imagenetClassesTopK(classProbabilities, k = 5) {
  const probs = _.isTypedArray(classProbabilities)
    ? Array.prototype.slice.call(classProbabilities)
    : classProbabilities;

  const sorted = _.reverse(
    _.sortBy(
      probs.map((prob, index) => [prob, index]),
      probIndex => probIndex[0]
    )
  );

  const topK = _.take(sorted, k).map(probIndex => {
    const iClass = imagenetClasses[probIndex[1]]
    return {
      id: iClass[0],
      index: parseInt(probIndex[1].toString(), 10),
      name: iClass[1].replace(/_/g, " "),
      probability: probIndex[0]
    }
  });
  return topK;
}
- 现在,你已添加在基本 Web 应用中使用 WebNN 运行图像分类所需的所有脚本。 使用 VS Code 的 Live Server 扩展,您现在可以在应用程序中启动您的基本网页,以亲自查看分类结果。